What is the diameter of the coil for a pirate metal detector. Do-it-yourself Pirate metal detector: manufacturing instructions
The dream of finding treasure is increasingly being replaced in our time by a more realistic program of searching for precious metals in a natural or artificial environment.
In modern conditions it is very important to find and extract valuable materials, who turned out to be among the waste, or in another uncontrolled environment.
Equipment is an important component of such search technology.
The search and extraction of gold and valuable metals from waste, garbage, in the natural environment is part of the recycling strategy, a technology for the effective processing of used materials, including.
Searching for them in the ground or in masses of industrial and other waste not only requires the use of equipment, but also stimulates its improvement. Are being created devices of different levels and specializations. There is interest in such equipment among amateurs and enthusiasts of searching for valuable metals.
 A metal detector is the most important tool for manually searching for metals in a chaotic natural or artificial environment.
Using such a device, you can search not only for silver, but also for silver and other precious metals.
Device principle any metal detector based on electromagnetic effects.
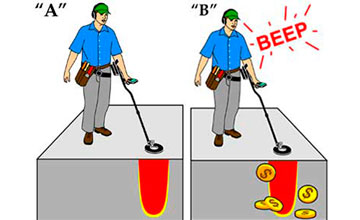
Here's how typical metal detecting technology works:
- Device creates an electromagnetic field.
- Metal an object, secretly located in a foreign environment, affects such a field when falls within its sphere of influence.
- Device detects the impact of an object on the electromagnetic field and signals this.
A large number of metal detector models operate precisely on this principle.
Technical differences in such equipment make it possible to obtain more complete information about the fact of detecting a metal object, for example:
- estimate the mass of the find;
- obtain data on the shape, size and configuration of an object;
- specify the location, including depth.
There is a lot of information on the Internet about metal detectors of varying complexity and design. There you can also refresh your memory about the theory of the electromagnetic field, studied at school.
The simplest, primitive metal detectors (usually these are homemade designs for searching for gold, silver and other metals by amateur enthusiasts) assembled from ready-made devices and products operating using electromagnetic effects.
Many are familiar with the primitive, but quite workable circuit of a metal detector, in which an electromagnetic field creates a pulse element of a conventional calculator.
 Reaction generated field on detected metal objects picks up the simplest household radio. The signal about such a find is audible, quite distinct and understandable.
More complex amateur and professional metal detecting devices retain the logical basis of the technology in the form of three components:
- electromagnetic field generator;
- sensor of changes in this field;
- equipment for assessing detected anomalies, signaling this.
Devices of different levels of complexity and functional potential can be divided into groups. Classification based on professionalism and user specializations – one of the generally recognized:
- amateur equipment, assembled by hand and used as a hobby tool or by beginners in metal detecting;
- semi-professional equipment necessary for enthusiastic amateurs and fanatics;
- professional metal detectors for those constantly working in this field;
- special devices for metal detectors in difficult conditions - at depth, under water, with the release of precious metals.
The distribution of search equipment is such that many devices of this type can be purchased at gardening and country supply stores.
A device for searching and detecting metal is needed not only for recycling, but also for searching for artifacts and treasures. Numerous security systems for everyone well-known frames - one of the technology versions metal search. The settings of these frames are focused on searching for weapons and similar dangerous objects.
Coil
A very important node metal detecting equipment – reel or frame. This is most often a winding of a special configuration, the task of which is to form an electromagnetic field and capture its reaction to the detection of a metal body foreign to the search environment.
In most designs the coil is placed on a long rod– a handle to move it near the search area.
For amateur production of reels, frames of the most popular types are sold. The easiest way to make such a purchase is in an online store.
 Many lovers make the coil frames yourself. This is done for reasons of cost savings or in the hope of obtaining a better-quality instrument of the author's design.
For this, improvised means are used– plastic products, plywood and even filling the assembled winding with construction foam.
The search operator or treasure hunter strives to find the most effective technique for working with a metal detector, choosing the desired operating modes of the electronics and the correct techniques for manipulating the coil.
Electronic circuit
The logical element of a metal detector is an electronic circuit. She performs many functions:
- The first task of this component is in creating an electromagnetic signal of the desired format, which is converted into a field using a coil.
- The second task of the electronic circuit is analysis of field changes captured by the frame, their processing.
- The third task is giving an informing signal to the operator– sound, light, indications of indicators and instruments.
It is best if anyone who wants to assemble an electronic circuit has knowledge of amateur radio or electronic technology. Such a master can not only assemble the required circuit, but also change and improve the design.
Many electronic devices are quite simple, Even a beginner can assemble them. The resulting device will be operational without configuration if the assembler exactly followed the recommendations of the developer of such a circuit.
How to make "Pirate" yourself?
 One of the most popular models of metal detectors designed for homemade amateur production is the “Pirate”.
This name, containing abbreviated details of its device and the developers' website, wittily reflects the romance of searching for precious metals.
Here the main advantages of this model:
- simplicity of device and assembly;
- low cost of parts and materials;
- sufficient operating parameters;
- recognized convenience for beginners.
The electronic circuit of this model does not require programming. In "Pirate" details available to everyone are used, a correctly assembled circuit is fully operational.
Design and operating principle
The design and layout of the “Pirate” metal detector is traditional for equipment of this kind. It is a rod, at the lower end of which there is a coil, and in the upper part – electronic unit with battery.
The location of the electronic unit should leave room for comfortable holding of the rod by hand.
Some craftsmen prefer that the sound signal from the device is supplied not by a speaker, but by headphones. In this case, the headphone cable departs from the electronic unit.
The technology of operation of the device is pulsed. This allows us to provide very good sensitivity indicators for this class of equipment. Below is a diagram of an electronic unit on microcircuits. 
A similar circuit can be assembled using transistors instead of microcircuits. This version may require additional settings, available only to experienced radio technicians. This is why the transistor circuit is used less frequently.
Materials, parts and blanks
In addition to the details and precision indicated on the circuit diagram of the electronic unit, for assembly metal detector for gold and other metals you will need to prepare some materials and blanks:
- a ready-made board for assembling an electronic circuit or foil material for making it yourself;
- power source in the form of any combination of batteries or batteries with a total voltage of 12V;
- enamel wire with a cross section of 0.5 - 0.6 mm for making a coil;
- stranded copper wire for connections with a cross-section of at least 0.75 sq. mm;
- housing for the electronic unit - a plastic container of a suitable size;
- a fairly strong plastic pipe for the rod;
- coil winding frame;
- consumables - solder, heat-shrinkable casing, electrical tape, screws and fasteners, adhesives and sealants.
It is best to make a printed circuit board for assembling an electronic circuit based on designs presented on the Internet.
Below is one of these samples, suitable for assembling electronics on microcircuits.

The manufacture of the board is carried out by amateurs of homemade electronics, and even then not all of them. Most people who want to create a metal detector themselves prefer to buy such a part.
To assemble the coil you will need a frame or frame, does not contain metal elements. An amateur craftsman can make such a frame from plywood, plastic, or select similar parameters from ready-made plastic products, for example, dishes. The frame can be purchased ready-made or made independently
Recommended coil parameters– 25 turns of enamel wire with a diameter of 0.5 mm on a mandrel with a diameter of 190-200 mm. An increase in diameter by 30% will lead to an increase in the sensitivity of the device, provided that the number of turns is reduced to 20-21.
The plastic frame for the coil is one of the most common metal detector parts on sale.
The technology for manipulating the coil is such that this very fragile unit can suffer from impacts from uneven ground, stones, and sharp objects. To avoid this the coil on the frame is covered from below with a plastic plate. This plate not only protects the reel, but also ensures that it glides through tall grass. The search becomes more intense.
Assembly procedure and design
 To successfully assemble a metal detector It is best to follow this procedure:
- manufacture of printed circuit boards and assembly of electronic circuits;
- choosing a suitable plastic container for it and completing the assembly of the electronic unit;
- coil manufacturing;
- manufacturing a rod of a convenient shape and attaching an electronic unit and coil to it, making connections for an electronic circuit.
Although the order of assembly is not fundamental. For those who manufacture a device for constant long-term work in the field of searching for non-ferrous metals and subsequent recycling (processing for reuse), ease of use is an important factor.
In this case, elaboration of the shape of the bar and the layout of the main elements of the apparatus becomes a key factor. Thus, a serious design phase appears in the creation of the device.
It is best to perform this stage of work using life-size modeling. Such modeling can be done using wooden parts of suitable shape, for example:
- shovel handle;
- plywood pieces of the desired shape;
- scraps from;
- temporary fasteners made from pieces of wire, nails and ropes.
Having made sure that the assembled model of the device will be sufficiently functional and convenient, you can begin the final assembly. Ready-made device, usually, does not require configuration, it is completely ready to work. You can start searching for metal by choosing the desired level of sensitivity and the correct tactics for manipulating the coil.
 Assemblers who need to assemble their apparatus as quickly as possible can use ready-made sets of parts.
Purchasing such a kit allows you to significantly simplify the production of “Pirate”. There is one of the proposals.
Users of the “Pirate” metal detector who have skills in amateur radio modify the design of this device. That's just several directions such improvements:
- Manufacturing coils with unusual parameters– in size, from special materials, for example, twisted pair cable.
- Arrangement of additional functional systems, for example, indicating the degree of battery discharge.
- Manufacturing models for underwater work.
- Add-ons electronic circuit, allowing to distinguish between metals(creating a discrimination function).
A simple, inexpensive and reliable metal detector “Pirate” works properly in a variety of conditions.
Homemade metal detector - pros and cons
Cheapness, basic advantage self-production of any products, relevant for a metal detector. Here are some others dignity for a homemade device:
- best match to search technology for beginners;
- the ability to create a device with a completely individual shape, design and configuration;
- the pleasure of making an effective, efficient device yourself.
Like any amateur-made device, a metal detector not without some drawbacks.
 Here are the features of the “Pirate” model that users note:
- energetic charge consumption power batteries;
- no discrimination, that is, precise sensitivity to ferrous, non-ferrous and precious metals;
- limited compared to expensive models sensitivity.
Despite its shortcomings, the Pirate model is very popular. This is explained by the simplicity of homemade production and the high performance of an inexpensive device.
Recycling experts believe that the discrimination capabilities of a metal detector are not of great importance. All metals found are so valuable that recycling them is always justified. Focusing on finding gold requires not only equipment, but also considerable experience, accompanying knowledge and, of course, Good luck.
Video on the topic
The video provides a detailed guide to making and assembling the Pirate metal detector with your own hands:
Conclusion
When the metal detector is ready, you can begin work. You need to be aware that not even the most advanced apparatus will allow you to find only golden hidden objects.
A metal detector will help you find valuable metal, and it is very likely that it will be gold. It is best if the future metal and gold seeker has a realistic understanding of search techniques.
Many features of the operation of finished equipment are very important for those who develop and assemble their own models. You need to have an idea of the technology in advance with such equipment - this is precisely the basis of its high-quality design.
The success of finding gold increases with experience. Here most important elements such experience:
- the correct choice of metal detector design and high-quality manufacturing of it yourself;
- ability to correctly select a search site;
- ability to use the full potential of a metal detector;
- choosing the right search technology in different conditions;
- modernization of the metal detector.
Properly assembled and debugged equipment will always help in the search for gold, and this valuable metal will definitely be found.
In contact with
Pirate- deciphered like this: P.I.- means a pulse metal detector, and RAT- author's website: "radioscot". This metal detector has gained fame as a simple and inexpensive device; there are a small number of available parts that are not in short supply; with proper assembly and serviceable parts, the device works immediately, with virtually no settings.
If we compare with the also simple circuit of a metal detector based on frequency beats, then here metal detection depth is an order of magnitude better. There is no discrimination in this type of metal detector; non-ferrous and ferrous metals react almost identically. But with certain skills, you can understand what target is under the sensor. The assembly and configuration of this metal detector is much simpler than the previously considered pulse metal detector.
Characteristics of the PIRATE metal detector
- Supply voltage: 9 – 12 volts.
- Current consumption: 30-40 mA.
- Coin Detection Depth (25mm): 20 cm.
- Large metal detection depth: 150 cm.
Of course, the performance largely depends on the parts used, coil diameter, build quality, etc.
Diagram of the metal detector "PIRAT"
There are many different options for PIRATE metal detector circuits and modifications to them.


Option: generator on NE555, and receiver on TL072
with generator frequency adjustment:

Option: generator on K561LA7/LE5, receiver on K157UD2

Printed circuit board of the PIRATE metal detector
There are also many different options for PP, below are a few options.
Option: generator on NE555, receiver on K157UD2

Option: generator with transistors, receiver with K157UD2

Option: generator on NE555, receiver on TL072

Description of the scheme
The metal detector circuit consists of two main components: transmitting and receiving.
Transmitting node consists of a pulse generator on the KR1006VI1 microcircuit (foreign analogue of NE555) and a powerful switch on field-effect transistor KP505A (foreign analogue of IRF740, IRF840). You can install a reverse bipolar transistor with a K-E voltage of at least 200V. It can be taken from an energy-saving lamp or a mobile phone charger. To drive a powerful switch, a BC557 transistor is used.
Receiving node assembled on the K157UD2 microcircuit (you can assemble a foreign MS TL072), there are back-to-back limiting diodes at the input of the receiver, at the input of the second stage of the receiver there is a filter that cuts out the required part of the pulses, at the output of the second stage there is a BC547 transistor, a speaker 8 is connected to its collector circuit -50 Ohm. In place of T3, you can use almost any NPN structure transistor.
List of parts for the PIRATE metal detector

All these radio components were used in old Soviet technology. You can also order them in online stores.
The speaker can be taken from a Chinese portable radio with a resistance of 8 - 50 Ohms. Also, for setting, you need two potentiometers for 10 kOhm and 100 kOhm. The metal detector is powered from 9 - 12 V. Sensitivity and operation are better from 12V. For this purpose, it is better to use batteries used in laptops.
Installation
We recommend soldering the metal detector circuit using pure rosin or an alcohol-rosin solution. Before you begin assembling the entire structure, we recommend checking the integrity of the parts with a multimeter, since radioelements may be defective. After soldering, be sure to thoroughly rinse the board with alcohol (vodka) using a toothbrush.

Metal detector coil
First option
The coil is wound on a mandrel of about 200 mm, it contains 25-30 turns of wire PEV, PEL, PETV... F-0.4 - 0.7. A pan of this size is suitable as a setting. It is better to wind the number of turns at 30 and then reduce it during the tuning process, achieving maximum sensitivity. To do this, we bring the coin to the coil and check with how many turns the coin will be “caught” from the greatest distance.
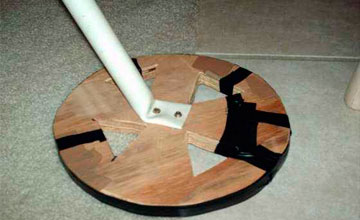
In order for the spool to have good strength and be attached to the barbell, it can be wound, for example, on an embroidery hoop. See photo below.

Second option (basket type coil)
With its help it is possible to obtain greater detection depth  , especially for small metals. The design features of sensors of this type make it possible to obtain a sensitivity up to 20% greater than a conventional sensor.
The coil is wound on a mandrel of 180 - 200 mm and contains 4 turns of twisted pair wire for a computer (no foil!). There are 8 wires in the cable.
4 turns * for 8 wires = we get 32 turns.
The inductance of this coil is 330 µH and the resistance is 2 Ohms.
When we wind the coil: thread the free long end of the cable into the formed loop, wrapping the second turn of the cable around the first. For one turn of the coil, you need to thread the free end of the cable through the coil 4-5 times.
When winding the coil, make sure that the cable is laid, strictly repeating the period of winding the previous turns.
We strip the ends of the wires from insulation, twist them, solder them and put insulating tubes on the connections. The wires of the two ends are connected to form a complete coil. You can connect in any way, one of the options in the table below:
|
Wire color one end |
Action |
Wire color other end |
|
connect to the board -> |
GREEN |
|
|
GREEN |
<─ спаять ─> |
WHITE- GREEN |
|
WHITE- GREEN |
<─ спаять ─> |
BLUE |
|
BLUE |
<─ спаять ─> |
WHITE- BLUE |
|
WHITE- BLUE |
<─ спаять ─> |
ORANGE |
|
ORANGE |
<─ спаять ─> |
WHITE-ORANGE |
|
WHITE-ORANGE |
<─ спаять ─> |
BROWN |
|
BROWN |
<─ спаять ─> |
WHITE-BROWN |
|
WHITE-BROWN |
< - подключить к плате |
Reel frame Must NOT contain metal! The coil itself in this type of metal detector is also DO NOT wrap in foil!

The wire connecting the coil and the board must be thick - ordinary electric copper stranded type PVS, PUNGP... 2 x 2.5 mm² or 2 x 1.5 mm², and it is also not advisable to use connections and connectors. In a pulse, the current reaches large values and all of the above affects the sensitivity of the device.
We wrap the coil tightly with electrical tape and solder the connecting wire.

The rod can be made from 4-5 m of PVC water pipe and a couple of jumpers to make the rod more convenient. At the end of the rod that you will hold, you can install a convenient hand rest made of plastic sewer pipe. Then we install the board in any box of suitable size and attach it to a rod. The design should not contain any foreign metal elements, as this will greatly distort the electromagnetic field of the device.
Setting up a metal detector
A properly assembled device requires virtually no adjustment. When setting up, you may just have to select a resistor (R12) , standing in series with the variable ( R13) so that clicks in the dynamics appear when its engine is in the middle position.
If you have an oscilloscope, you can check the duration of the control pulse and the frequency of the generator at the T2 gate. The optimal pulse option is 130-150 μs, frequency 120-150 Hz.
R1 in the generator is responsible for the generation frequency. R2 - for the duration of the control pulse. Voltages at the op-amp terminals (without the presence of metal in the sensor area):
- vyv. 2-6.5v
- vyv. 3-6.5v
- vyv. 5-5.5v
- vyv. 6-3.5v
- vyv. 9-0.7v
- vyv. 13-6.2v
For more detailed settings, as well as when repairing a metal detector, it is advisable to have an oscilloscope. Oscillograms at various points in the circuit are shown in the pictures below.
| 3 leg time.div 10μs volt.div 05v without metal. | 3rd leg - with metal | ||
| 13 leg-2ms-2v without metal | 13 leg-2ms-2v with metal | ||
| 13 leg-100mks-2v without metal | 13 leg-100mks-2v with metal | ||
| 5 leg-1ms-2v without metal | 5 leg-1ms-2v with metal | ||
| 7 leg-1ms-5v without metal | 7 leg-1ms-5v with metal | ||
| 7 leg-100mks-5v with metal | legs 2.6 and power—2ms-100mv without metal | ||
| -1ms - no metal | -1ms- with metal. |
When turning it on, wait 15-20 seconds, after which we use the SENSITIVITY regulator to find a position at which clicks are heard in the speaker - this will be the maximum sensitivity.
Refinement of the metal detector "PIRAT"
Two signal generator circuits
In order to ensure that there are not clicks in the dynamics, but a “beeping”, a generator circuit is assembled for this purpose in front of the ULF.

We present to your attention a diagram of a simple pulse metal detector PIRAT. Agree, trying to find something underground is a very exciting activity; perhaps someone will be interested in this scheme to try, and someone will want commercial benefits from searching for metals. The PIRAT metal detector is quite simple to manufacture and does not require complex settings, it does not contain rare or expensive parts, and in terms of parameters it competes with some imported items in the price category of 100-300 dollars. The main advantages of this device are range and stability. Even people with basic knowledge of electronics can assemble it.
 type of printed circuit board of a pirate metal detectorDevice parameters: power supply - 9-12 volts, current consumption - 35-40 mA, sensitivity - 25 millimeter coin - 20 cm, large objects up to 150 cm, the device contains two main nodes: receiving and transmitting. In the transmitting node - a pulse generator on the NE555 chip, or a Soviet analogue - KR1006VI1 and a switch on the IRF740 transistor. The receiving unit operates on a BC547 transistor and a K157UD2 microcircuit.

 The coil should be wound on a frame with a diameter of 190 mm, it contains 25 turns (PEV wire 0.5.-0.6). As a last resort, you can use KT 817 as transistor T2, well, this is already a field for experimentation. As T3, almost any NPN transistor. A properly assembled metal detector requires virtually no adjustment. In order for clicks in the speaker to be heard when R13 is in the middle position, it is necessary to select a resistor R12. An oscilloscope can measure the frequency of the oscillator and the duration of the control pulse at the T2 gate. The optimal pulse value is 120-150 µs, frequency 130-150 Hz.
Complete list of required radio components and pinout.


 Working with a metal detector: after turning it on, wait 15-20 seconds, then use the regulator to find the position at which clicks can be heard in the loudspeaker - this will be the maximum sensitivity of the device. You can learn how to operate the device literally after just a few turns on. Anyone who has difficulty purchasing an NE555 or KR1006VI1 microcircuit can make a generator using transistors. It may be necessary to select the pulse duration and frequency due to the scatter of parameters. For this, it is advisable to have an oscilloscope.
Metal detector Pirate- one of the best metal detectors for a beginner. It is simple and the parameters are surprising. However, you always want to achieve more from a device, to somehow improve it. So I made a 2 in 1 coil for this metal detector. I just tried it, I didn’t even think that the performance would improve.
When I did it, the search parameters turned out to be as follows: 5 rubles pure sensitivity at 20 cm, a vodka coin (silver) with a diameter of 12 mm, pure sensitivity at 15 cm (with clicks 17-18 cm)!!! That is, non-ferrous metals (such as silver and gold) this metal detector sees better than, for example, nickel. And another important characteristic of this coil (besides increased sensitivity) is that the entire coil sees metals evenly, compared to an ordinary one (it sees better along the rim, but worse in the center, and is not as sensitive).
Coil parameters: large coil: frame 20 cm, wound 20 turns; Smaller coil: frame 9 cm 5 turns. And both coils are wound with 0.6 mm wire and connected in series, it turns out to be one coil. And for strength, I tightly wrapped both coils with threads and poured them with instant glue, but you can also use varnish. Here is a photo:


Then I used a machine to level out these mountains formed when tearing off the foam, although it didn’t turn out quite evenly, but after filling the coil will be fine.

Then I cut out “ears” from PCB and made holes in them for a plastic bolt, and then filled them with epoxy resin.


Just use REGULAR EPOXY! If you use a quick-hardening one, then while you are stirring it, it will set in half a minute and will heat up very much! My regular one got hot, the foam sank, but the coil managed to set, so it didn’t change shape. Next, we take out the dried coil of polystyrene foam and process the bur with a machine and a grinder. The result is this candy:


Powered metal detector pirat, from 12 volts, you can use regular batteries, but it is better, of course, to take a good battery, for example from a screwdriver. Personally, I use it, or rather the batteries that are in it.
Search coil metal detector Pirate, wound on a 190 mm frame. and contains 25 virks, PEV wires 0.5 mm.
- Current consumption 30-40 mA
Pirat metal detector diagram:


Chip NE555:

Transistor IRF740:

Variable resistors:


This is how it should work:


For K157UD2 it is better to install an adapter socket, and for NE555 You can also install it, it won’t hurt!))


The lady conducted tests on a medium reel with a diameter of 15 cm. So the gold ring caught in the air at 18 cm, scissors 30 cm. table lamp 50cm. which isn't bad enoughThe circuit of the “Pirate” metal detector is very simple and understandable even for novice radio amateurs. It consists of two microcircuits that do not need to be flashed or programmed. It is very easy to assemble, you just need to solder all the parts in the right places!))
Attention! I make custom MD “Pirate”, write to kavinskiy on Skype or write comments! Thank you!
The pirat metal detector is powered by 12 volts, you can use regular batteries, but it is better, of course, to take a good battery, for example from a screwdriver. Personally, I use it, or rather the batteries that are in it.
The search coil of the Pirat metal detector is wound on a 190 mm frame. and contains 25 virks, PEV wires 0.5 mm.
Metal detector characteristics:
Current consumption 30-40 mA
Reacts to all metals, no discrimination
Sensitivity 25 mm coin - 20 cm
Large metal objects - 150 cm
All parts are inexpensive and easily available.
Required parts for assembly:
pirate_details
Pirat metal detector diagram:
ON UD2 (1)
The circuit uses 2 microcircuits (NE555 and K157UD2). They are quite common. K157UD2 - you can pick it out of old equipment, which I did with success.
pirate_microshema1
Chip NE555:
NE555N
Transistor IRF740:
pirate_transistor_1
Variable resistors:
pirate_rezistor_1
Be sure to take 100nF film capacitors, like these, take the voltage as low as possible:
pirate_condensatori
Print out the board sketch on plain paper:
pirate_pechatka_1
We cut a piece of textolite to its size:
pirate_pechatka_2
We apply it tightly and press it with a sharp object in the places of future holes:
pirate_pechatka_2
This is how it should work:
pirate_pechatka_3
pirate_pechatka_4
pirate_pechatka_5
After drilling, you need to draw tracks. You can do this through photoresist, LUT, or simply paint them with Nitro varnish with a simple brush. The tracks should look exactly the same as on the paper template. And we poison the board.
pirate_pechatka_6
pirate_pechatka_7
pirate_pechatka_8
For K157UD2 it is better to install an adapter socket, and for NE555 you can also install it, it won’t hurt!))
pirate_montag_1
pirate_montag_2
pirate_montag_3
To wind the search coil you need a copper wire with a diameter of 0.5-0.7 mm
pirate_wire
I wound the coil on a simple pan, 190 mm in diameter. After which, I wrapped everything with duct tape:
pirate_katuschka
According to the diagram, the coil has a diameter of 19 cm and contains 25 turns. I’ll immediately note that the coil needs to be made of such a diameter based on what you will be looking for. The larger the coil, the deeper the search, but a large coil does not see small details well. The small coil sees small details well, but the depth is not great.
I immediately wound three coils of 23cm (25 turns), 15cm (17 turns) and 10cm (13-15 turns). If you need to dig up scrap metal, then use a large one; if you are looking for small things on the beach, then use a smaller reel, but you’ll figure it out for yourself.
pirate_katuschka_3
pirate_katuschka_2
The coil should be as level as possible. The speaker took the first one he came across.
Now we connect everything and test the circuit to see if it works.
After applying power, you need to wait 15-20 seconds until the circuit warms up. We place the coil away from any metal, it is best to hang it in the air. Then we begin to twist the 100K variable resistor until clicks appear. As soon as the clicks appear, turn it in the opposite direction; as soon as the clicks disappear, that’s enough. After this, we also adjust the 10K resistor.
Regarding the K157UD2 microcircuit. In addition to the one I picked out, I asked one more from a neighbor and bought two at the radio market. I inserted the purchased microcircuits, turned on the device, but it refused to work. I racked my brains for a long time until I simply installed another microcircuit (the one I removed). And everything started working right away. So this is why you need an adapter socket, so that you can select a live microcircuit and not have to worry about desoldering and soldering.
Everything is ready, all that remains is to make a rod and place the board in the case and look for treasures)
pirate_gotoviy
And lastly, I’m throwing in a video of a pirate at work!
The lady conducted tests on a medium reel with a diameter of 15 cm. So the gold ring caught in the air at 18 cm, scissors 30 cm. table lamp 50cm. which is not bad enough for such a metal detector.
You can download the printed circuit board in Sprint-Layout format here!for such a metal detector.
Metal detector circuit board
You can download the printed circuit board in Sprint-Layout format!