The contact writes the wrong size of the photo. Uploading large VKontakte photos in high quality
By filling out the form on our website, you agree to our privacy policy. You also agree that we have the right to disclose your personal data in the following cases:
1) With your consent: In all other cases, before transferring information about you to third parties, our Company undertakes to obtain your explicit consent. For example, our Company may run a joint offer or competition with a third party, in which case we will ask you for permission to share your personal information with the third party.
2) Companies working on our behalf: We cooperate with other companies that perform business support functions on our behalf, in connection with which your personal information may be partially disclosed. We require such companies to use the information only for the purpose of providing contracted services; they are prohibited from transferring this information to other parties in situations other than when it is necessary to provide the agreed services. Examples of business support functions: fulfillment of orders, fulfillment of requests, issuance of prizes and bonuses, conducting surveys among customers and managing information systems. We also disclose aggregated non-personally identifiable information when selecting service providers.
3) Subsidiaries and joint ventures: Subsidiary or joint venture means an organization, at least 50% of which is owned by the Company. When transferring your information to a subsidiary or joint venture partner, our Company requires that this information not be disclosed to other parties for marketing purposes and that your information not be used in any way contrary to your choice. If you have indicated that you do not want to receive any marketing materials from our Company, then we will not share your information with our subsidiaries and joint venture partners for marketing purposes.
4) On co-positioned or affiliate pages: Our Company may share information with partner companies, together with which it implements special offers and promotional activities on the jointly positioned pages of our website. When requesting personal data on such pages, you will receive a warning about the transfer of information. The partner uses any information you provide in accordance with its own privacy notice, which you can read before providing information about yourself.
5) When transferring control over the enterprise: Our Company reserves the right to transfer your personal data in connection with the total or partial sale or transfer of our company or its assets. When selling or transferring a business, our Company will provide you with the opportunity to opt out of transferring information about yourself. In some cases, this may mean that the new organization will no longer be able to provide you with the services or products previously provided by our Company.
6) Law enforcement agencies: Our Company may, without your consent, disclose personal information to third parties for any of the following reasons: to avoid violations of the law, regulations or court orders; participating in government investigations; assistance in fraud prevention; and strengthening or protecting the rights of the Company or its subsidiaries.
All personal information that you submitted for registration on our website can be changed at any time or completely deleted from our database at your request. To do this, you need to contact us in any way convenient for you, using the contact information posted in a special section of our website.
If you would like to unsubscribe from receiving our regular mailing list, you can do so at any time using the special link at the end of each email.
Vkontakte quite spoils the quality of uploaded photos. In some cases, this is especially noticeable (for example, when loading a very large image). I even posted examples how some of the photos were corrupted. It may not be noticeable to some users, but a trained eye wedding photographer, or just an attentive person sees two different photos. So, how to deal with it? Until recently, I just changed the size of the photo, however, from time to time I still noticed, albeit not so significant, but still a deterioration in the quality of the photo. After reading about this problem on the Internet, I learned an interesting technique, which (slightly improved) I will share with you.
So we have a big beautiful photo. I’ll make a reservation right away, I’m writing only for those who have Photoshop - I wasn’t interested in how to do similar operations in other editors, but the principle should be the same. How can we put this photo in contact so that the straight lines do not become jagged, and the colors remain as we see them? In short, there are three points here:
1) Strongly increase the sharpness of the photo. In full size, the photo should even become too sharp, oversharpened, but after reducing the sharpness will return to normal.
2) In a cunning way, we reduce the size of the photo to the one that the contact likes (1024 in height for vertical photos, and 1280 in width for horizontal ones).
3) We save in a no less tricky way, so that the photo does not contain unnecessary information, is in the sRGB color space and is of optimal quality.
Now more. For example, I took my photo with a beautiful lovestory-photo shoots in an abandoned manor.
1. Open the photo in Photoshop.
2. Create a duplicate layer, apply a filter to it - another - color contrast with a radius of about 3 pixels. Then set the layer to "Overlay" mode and flatten. Thus, we have increased the sharpness of the photo.
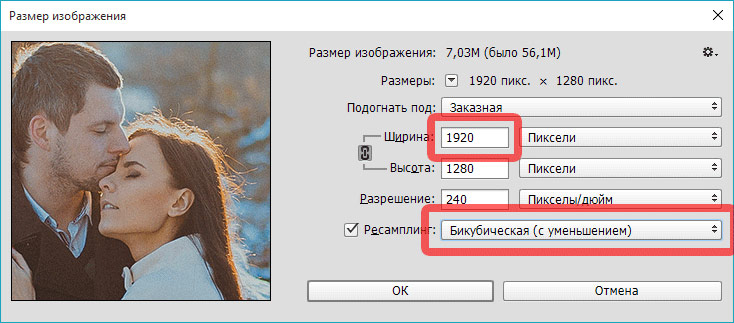
3. Select Image -> image size.
4. We exhibit: For horizontal images - width 1920, for vertical- height 1536 (dimensions one and a half times the final ones), resampling - Bicubic, with a decrease (in other versions of Photoshop - Bicubic, clearer), apply.
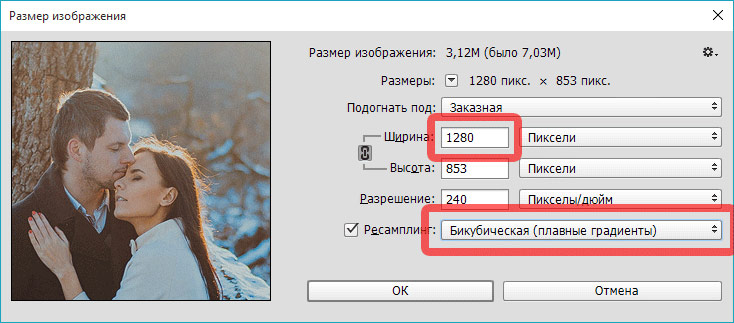
5. Select Image -> image size.
6. We exhibit: For horizontal images - width 1280, for vertical- height 1024, resampling - Bicubic, smooth gradients (in other versions of Photoshop - Bicubic, best for smooth gradients), apply.
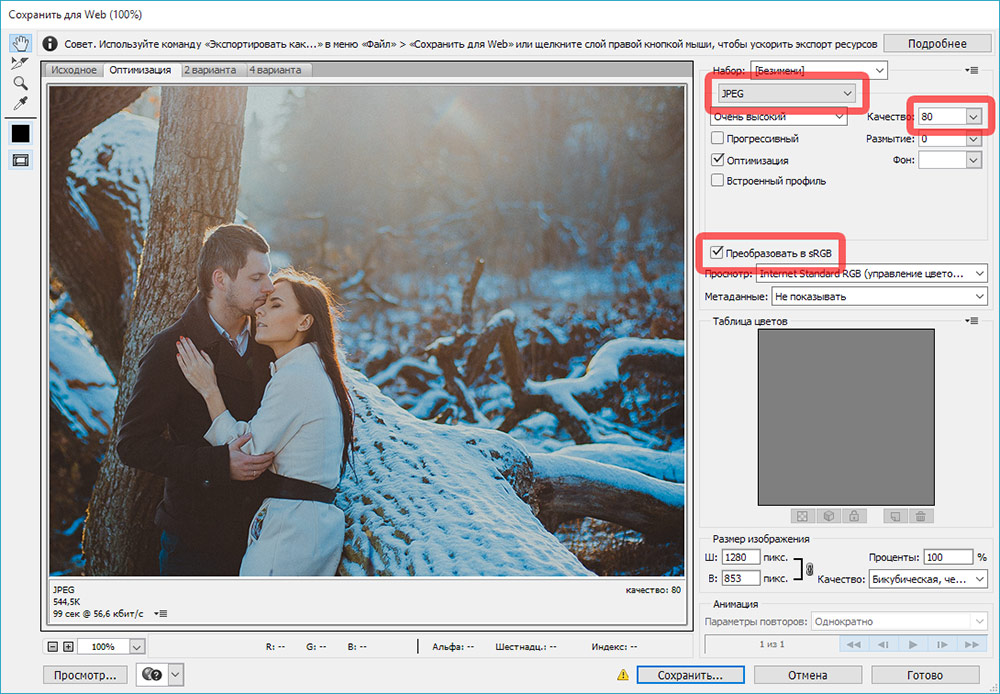
The resulting file and upload it to the contact. As a result, quality loss will be minimal and colors will match what you see on your monitor. I think that this technique is suitable not only for VKontakte, but also for other social networks, and just transferring files over the Internet, because as a result you get an image of optimal weight, size and clarity, which will be equally displayed in any color space (t .e on any computer).
P.S. Here is what VKontakte support writes about this:
The quality of photos deteriorates when uploading, what should I do?
To minimize visual quality loss, it is better to upload smaller images (up to 1000 pixels on either side) and slightly sharpen them before uploading. In addition, it is better not to click on the “Add new photos” line, but to drag a picture onto it directly from the computer folder.
There is another important detail: our uploader does not like the Adobe RGB color profile, so it is better to convert the image for the Web before uploading. The algorithm of actions is as follows: in Photoshop, you need to select "Save for WEB" (Alt + Shift + Ctrl + S), then edit the quality settings and be sure to check "Convert to sRGB".
The most valuable pictures should be uploaded to the documents section -
largest social network Vkontakte has never spoiled photographers. And yet, many and many of us post our pictures there, because the audience of Contact is truly huge. Everything is there: friends, acquaintances, colleagues, clients. In addition, Contact is progressing rapidly, and if earlier photos were limited to tiny (604 by 480) sizes and terrible compression, now there is much less loss in compression, and photos are shown in almost the entire browser window.
The downside of such rapid progress is that it is difficult to keep track of it. If today photos are processed in one way when uploading, then tomorrow they may be uploaded in a completely different way! Changes are often not announced or explained. Everything happens quietly and without the knowledge of the user. Which is quite understandable: the site is made as simple as possible, designed for the widest audience.
But back to our photos. For some time now, Contact has begun to display large photos that expand to almost full screen. The image size is limited only by the original resolution of the image, the resolution of the user's monitor and his browser. At the same time, the site stores the original and scales the image to fit the user's window. The key point was that after scaling, the photo was sharpened. Which compensated for the blurring after resizing.
At the same time, the best tactic was to upload large photos to Contact, for example, 1920x1080 without additional sharpening. After scaling and sharpening by the site itself, the photos looked good.
For some time now, about a month ago, I noticed that Contact stopped sharpening photos. Since then, everything that was loaded according to the old scheme began to look unsharp. How now to upload pictures to Contact? I have several thoughts on this.
Preparing photos for uploading to Contact
Part I. Sharpness.
Firstly, if we want to show large (in the entire browser window) photos in Vkontakte, then we cannot know the final size of the image, since it depends on the resolution of the viewer's monitor, as well as his browser and even the settings of this browser.
In today's most popular monitor resolution of 1280x1024, a photo in VKontakte "in full window" turns out to be of the following dimensions:
Firefox 4.0 - 1058 horizontally or 760 vertically.
Opera 11- 1054 horizontally or 752 vertically.
Secondly, you need to understand that for optimal clarity, sharpening should occur after resizing the image, and not before, as it happened until recently in Kontakt's algorithms. By the way, the pictures uploaded then are still displayed sharp and neat, i. their sharpness increases after scaling.
So now is the best time to prepare your shots. 1000px in width or 750px in height (for vertical), independently increasing their sharpness before loading. At the same time, they will be displayed quite large on monitors 1280x1024 and higher, with the optimal sharpness that we set up ourselves. Unfortunately, on smaller monitors, such pictures will be reduced and lose image clarity.
If you want to upload large images so that they are displayed in the entire window on any monitors, then before uploading, you should slightly increase their sharpness, which partly compensates for the blurring when scaling the image.
Part II. Color.
Sometimes people complain that Contact spoils the color of photos. But often this is not the fault of Contact at all, but the wrong choice of color space for photography. Pictures uploaded to the Internet (to any site, not just to Contact) must be in the sRGB color space. If the photo is in Adobe RGB, ProPhoto RGB, or any other color space other than sRGB, then the colors will become dimmer after being uploaded to the web.
Part III. Preparing a Contact Photo in Photoshop
First, make sure our image is in sRGB., to do this, in the lower left corner, click on the small black triangle and select the "Document profile" item in the menu that appears.
This will show the color space of the photo in the bottom line. We need it to be written sRGBIEC61966-2.1, if another color space is indicated there, then we need to change it.
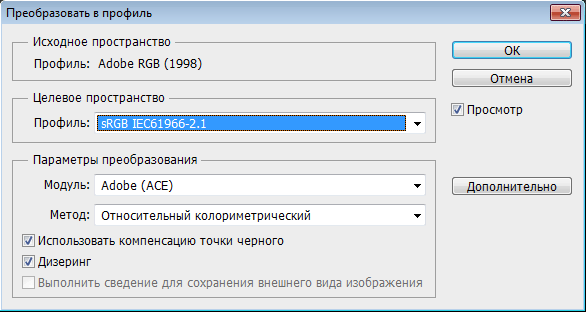
This is done simply. Let's go to the menu: Editing - Convert to Profile…
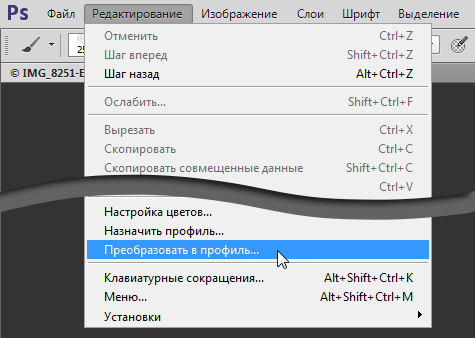
And in the window that appears, in the field target space choose a profile sRGB. We do not touch the rest and click "OK". It is done!
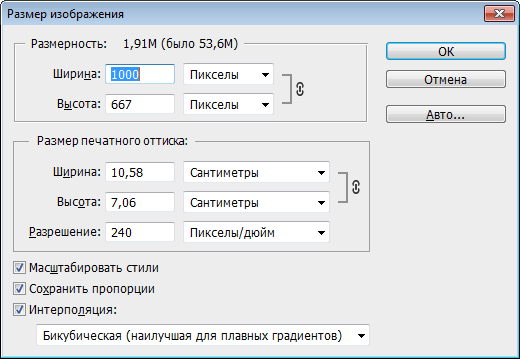
Second step - resizing. Press Ctrl+Alt+I (Image Size command) and set the width in the window that appears 1000 if we have a horizontal photo, or height 750 if the photo is vertical. In this case, all the checkboxes must be enabled, the “Keep aspect ratio” setting will provide us with the correct aspect ratio. In the section Interpolation should be Bicubic (best for smooth gradients). How to make this algorithm installed by default, you can read in the article.
The third step is sharpening. You can sharpen in many ways, sometimes the most exotic. But I will show one, quite simple, but effective, which I use to sharpen under the WEB.
Menu: Filter - Sharpen - Smart Sharpen…
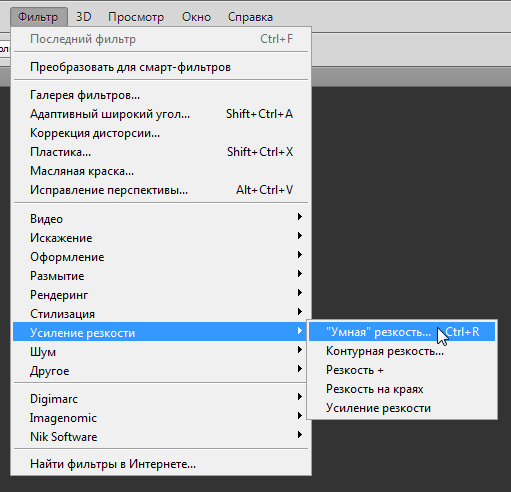
Parameters: Effect 500, Radius 0.1.
Delete: Blur at shallow depth. The "More precisely" checkbox is enabled.

Now everything is ready. We save the photo in JPEG format with maximum quality (contact will squeeze it anyway) and upload it to Contact!)
Part IV. Preparing Contact Photos in Adobe Lightroom
In order not to get up twice, let's look at how to prepare pictures for a Contact using Lightroom. In LR, everything is much simpler, you need to configure the export parameters as follows:
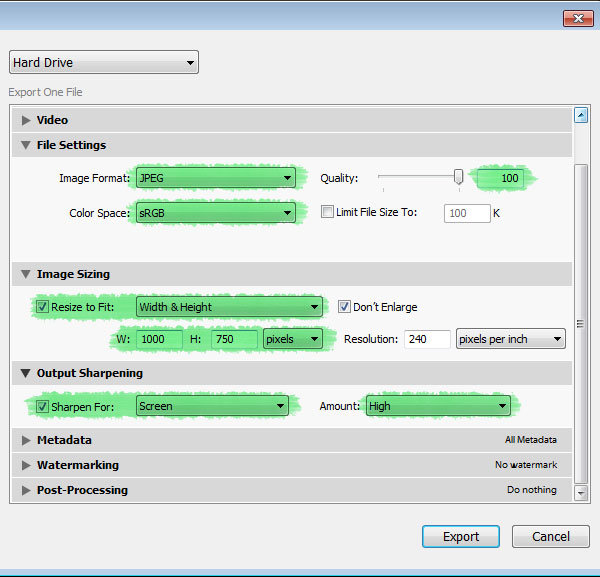
And everything will be beautiful!)
In general, of course, pictures need to be printed, at least 40 by 60 cm, and preferably more!